理论基础
链表是一种通过指针串联在一起的线性结构,每一个节点由两部分组成,一个是数据域一个是指针域(存放指向下一个节点的指针),最后一个节点的指针域指向null(空指针的意思)。
链表的入口节点称为链表的头结点也就是head。
如图所示: 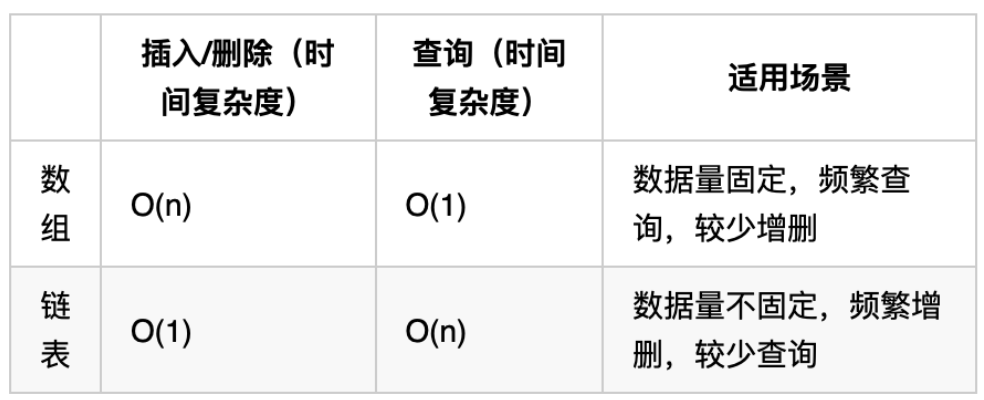
1
2
3
4
5
6
7
8
9
10
11
12
13
14
15
16
17
18
19
20
21
22
| public class ListNode {
int val;
ListNode next;
public ListNode() {
}
public ListNode(int val) {
this.val = val;
}
public ListNode(int val, ListNode next) {
this.val = val;
this.next = next;
}
}
|
存储方式
链表在内存中不是连续分布的,是通过指针域的指针链接在内存中各个节点。
所以链表中的节点在内存中不是连续分布的 ,而是散乱分布在内存中的某地址上,分配机制取决于操作系统的内存管理。
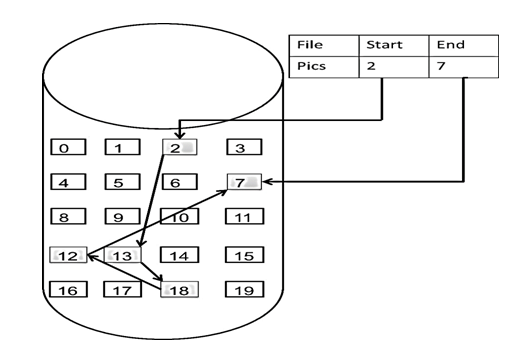
这个链表起始节点为2, 终止节点为7, 各个节点分布在内存的不同地址空间上,通过指针串联在一起。
基本操作
删除节点
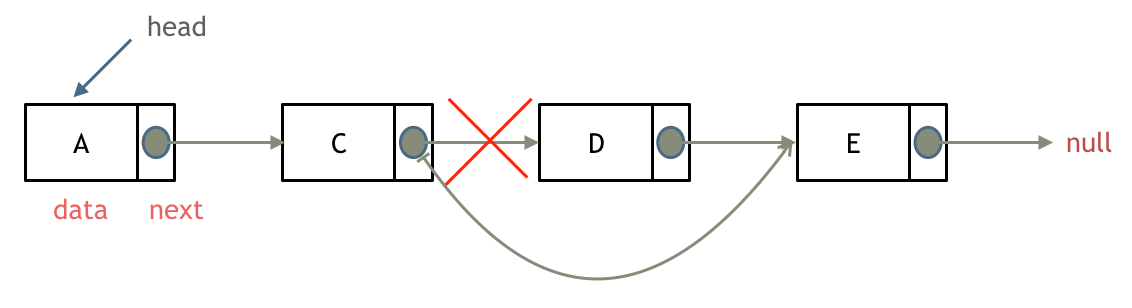
将C节点的next指针指向E节点就可以。
在C++里最好手动释放D节点,释放这块内存。
其他语言例如Java、Python有自己的内存回收机制。
添加节点
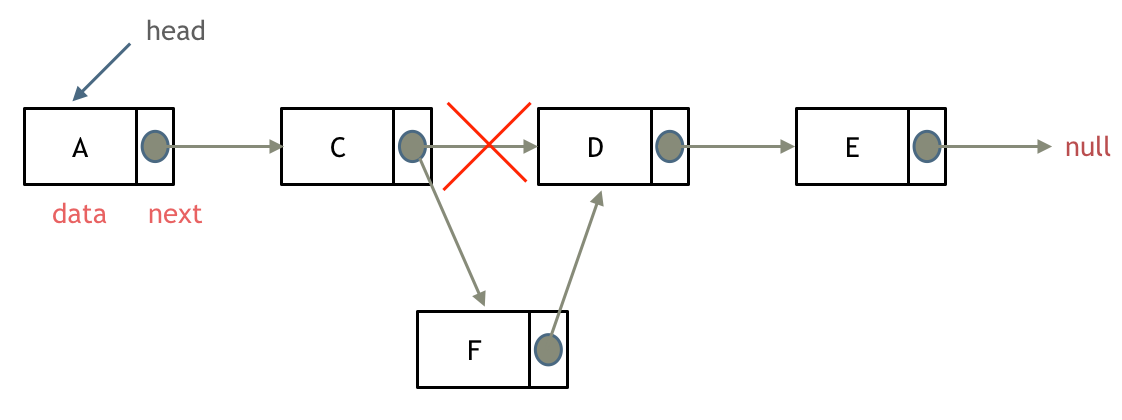
把新节点F的next指针指向C节点原本的next,再让C节点原本的next指针指向F节点。链表的增添和删除都是O(1)操作,也不会影响到其他节点。
要是删除E节点,就需要从头节点查找到D节点,再通过next指针进行删除操作,查找的时间复杂度是O(n)。
总结
数组在定义的时候,长度就是固定的,如果想改动数组的长度,就需要重新定义一个新的数组。
链表的长度可以是不固定的,并且可以动态增删, 适合数据量不固定,频繁增删,较少查询的场景。
移除链表元素
203.移除链表元素
题意:删除链表中等于给定值 val 的所有节点。
示例 1: 输入:head = [1,2,6,3,4,5,6], val = 6 输出:[1,2,3,4,5]
示例 2: 输入:head = [], val = 1 输出:[]
示例 3: 输入:head = [7,7,7,7], val = 7 输出:[]
思路
原链表操作
其实上面已经讲过了。移除操作,就是让节点next指针直接指向下下一个节点就可以了,
因为单链表的特殊性,只能指向下一个节点,如果删除的是头结点又该怎么办呢?
这里就涉及如下链表操作的两种方式:
- 直接使用原来的链表来进行删除操作。
- 设置一个虚拟头结点在进行删除操作。
如果直接使用原来的链表来进行移除,移除头结点和移除其他节点的操作是不一样的。
因为链表的其他节点都是通过前一个节点来移除当前节点,而头结点没有前一个节点,只能将头结点向后移动一位从链表中移除。需要单独写一段逻辑来处理移除头结点的情况。
1
2
3
4
5
6
7
8
9
10
11
12
13
14
15
16
17
18
19
20
21
22
23
24
25
26
27
|
class Solution {
public ListNode removeElements(ListNode head, int val) {
while (head != null && head.val == val) {head = head.next;}
if (head == null) {return head;}
ListNode pre = head;
ListNode cur = head.next;
while (cur != null) {
if (cur.val == val) {
pre.next = cur.next;
} else {
pre = cur;
}
cur = cur.next;
}
return head;
}
}
|
虚拟头结点
设置一个虚拟头结点,这样原链表的所有节点就都可以按照统一的方式进行移除了。它充当链表的伪头部,帮助处理边界情况。在循环中,我们不需要检查 head 是否为 null,而是可以从虚拟节点开始遍历,简化了代码的结构。
这里一开始设置dummy指向head,cur是当前指向节点的指针,初始化时指向虚拟头节点。接下来,我们遍历链表,直到 链表结束。
最后,返回dummy.next,即去除目标值节点后的链表的头结点。如果链表头部的节点被删除了,它就是新的头节点。如果链表头部没有被删除,它依然指向原始链表的头节点。
1
2
3
4
5
6
7
8
9
10
11
12
13
14
15
| public ListNode removeElements(ListNode head, int val) {
ListNode dummy = new ListNode();
dummy.next = head;
ListNode cur = dummy;
while (cur.next != null) {
if (cur.next.val == val) {
cur.next = cur.next.next;
} else {
cur = cur.next;
}
}
return dummy.next;
}
|
设计链表
707.设计链表
题意:
在一个链表类中实现这些功能:
- get(index):获取链表中第 index 个节点的值。如果索引无效,则返回-1。
- addAtHead(val):在链表的第一个元素之前添加一个值为 val 的节点。插入后,新节点将成为链表的第一个节点。
- addAtTail(val):将值为 val 的节点追加到链表的最后一个元素。
- addAtIndex(index,val):在链表中的第 index 个节点之前添加值为 val 的节点。如果 index 等于链表的长度,则该节点将附加到链表的末尾。如果 index 大于链表长度,则不会插入节点。如果index小于0,则在头部插入节点。
- deleteAtIndex(index):如果索引 index 有效,则删除链表中的第 index 个节点。
示例:
1
2
3
4
5
6
7
8
9
10
11
12
13
14
| 输入
["MyLinkedList", "addAtHead", "addAtTail", "addAtIndex", "get", "deleteAtIndex", "get"]
[[], [1], [3], [1, 2], [1], [1], [1]]
输出
[null, null, null, null, 2, null, 3]
解释
MyLinkedList myLinkedList = new MyLinkedList();
myLinkedList.addAtHead(1);
myLinkedList.addAtTail(3);
myLinkedList.addAtIndex(1, 2); // 链表变为 1->2->3
myLinkedList.get(1); // 返回 2
myLinkedList.deleteAtIndex(1); // 现在,链表变为 1->3
myLinkedList.get(1); // 返回 3
|
思路
定义链表结构,初始化。
head = new ListNode(0),设置虚拟头结点,在初始化时即存在于链表首位。
1
2
3
4
5
6
7
8
9
10
11
12
13
14
15
16
17
18
| class ListNode {
int val;
ListNode next;
ListNode(){}
ListNode(int val) {
this.val=val;
}
}
class MyLinkedList {
int size;
ListNode head;
public MyLinkedList() {
size = 0;
head = new ListNode(0);
}
}
|
get(index)
获取链表中第 index 个节点的值。如果索引无效,则返回-1。
index是从0开始的,第0个节点就是头结点。
先判断index合法性,然后找到index对应的节点,取值。
1
2
3
4
5
6
7
8
9
10
| public int get(int index) {
if (index < 0 || index >= size) {
return -1;
}
ListNode currentNode = head;
for (int i = 0; i <= index; i++) {
currentNode = currentNode.next;
}
return currentNode.val;
}
|
addAtHead(val)
你怎么敢违抗有虚拟头结点的我呢.jpg。
直接让新的头结点指向原本的首位,再让虚拟头结点指向新的头结点。
1
2
3
4
5
6
| public void addAtHead(int val) {
ListNode newNode = new ListNode(val);
newNode.next = head.next;
head.next = newNode;
size++;
}
|
addAtTail(val)
遍历到cur.next == null,此时已经是末尾。
然后补充一个节点即可。
1
2
3
4
5
6
7
8
9
| public void addAtTail(int val) {
ListNode newNode = new ListNode(val);
ListNode cur = head;
while (cur.next != null) {
cur = cur.next;
}
cur.next = newNode;
size++;
}
|
addAtIndex(index,val)
将一个节点插入到链表中下标为index的节点之前。如果 index等于链表的长度,那么该节点会被追加到链表的末尾。如果 index比长度更大,该节点将 不会插入 到链表中。
总之就是先判断index合法性,然后要找到目标节点的前一位,改变next即可实现插入。
1
2
3
4
5
6
7
8
9
10
11
12
13
14
15
16
17
| public void addAtIndex(int index, int val) {
if (index > size) {
return;
}
if (index < 0) {
index = 0;
}
size++;
ListNode pred = head;
for (int i = 0; i < index; i++) {
pred = pred.next;
}
ListNode toAdd = new ListNode(val);
toAdd.next = pred.next;
pred.next = toAdd;
}
|
deleteAtIndex(index)
先判断index合法性,然后要找到目标节点的前一位,指向next的next,即可实现删除。
1
2
3
4
5
6
7
8
9
10
11
| public void deleteAtIndex(int index) {
if (index < 0 || index >= size) {
return;
}
size--;
ListNode pred = head;
for (int i = 0; i < index ; i++) {
pred = pred.next;
}
pred.next = pred.next.next;
}
|
翻转链表
206.翻转链表
题意:反转一个单链表。
示例:
输入: 1->2->3->4->5->NULL
输出: 5->4->3->2->1->NULL
思路
只需要改变链表的next指针的指向,直接将链表反转 ,而不用重新定义一个新的链表。并没有添加或者删除节点,仅仅是改变next指针的方向。
双指针
哥们,其实有三个指针,pre,cur,next。
首先定义一个cur指针,指向头结点,再定义一个pre指针,初始化为null。
然后开始反转,首先要把 cur.next 节点用next指针保存一下,因为接下来要将现在的cur.next 指向pre ,此时就已经反转了第一个节点了。
接下来继续移动pre和cur指针。最后,cur 指针已经指向了null,循环结束,链表也反转完毕。 此时pre指针就指向了新的头结点。
1
2
3
4
5
6
7
8
9
10
11
12
13
14
| class Solution {
public ListNode reverseList(ListNode head) {
ListNode prev = null;
ListNode cur = head;
ListNode next = null;
while (cur != null) {
next = cur.next;
cur.next = prev;
prev = cur;
cur = next;
}
return prev;
}
}
|
递归
其实就是不断将cur指向pre,当cur为空的时候循环结束的过程。
关键是初始化的地方。
1
2
3
4
5
6
7
8
9
10
11
12
13
14
15
| class Solution {
public ListNode reverseList(ListNode head) {
return reverse(null, head);
}
private ListNode reverse(ListNode prev, ListNode cur) {
if (cur == null) {
return prev;
}
ListNode temp = null;
temp = cur.next;
cur.next = prev;
return reverse(cur, temp);
}
}
|
交换相邻节点
24.两两交换链表中的节点
给你一个链表,两两交换其中相邻的节点,并返回交换后链表的头节点。你必须在不修改节点内部的值的情况下完成本题(即,只能进行节点交换)。
示例 1:
1
2
| 输入:head = [1,2,3,4]
输出:[2,1,4,3]
|
示例 2:
示例 3:
提示:
- 链表中节点的数目在范围
[0, 100] 内
0 <= Node.val <= 100
思路
使用虚拟头结点,这样就不需要单独处理首位的逻辑了。
正常模拟即可,prev,cur,next三个指针不断更新位置,直到cur == 0 或者 next == 0 为止。
1
2
3
4
5
6
7
8
9
10
11
12
13
14
15
16
17
18
19
20
21
22
23
| class Solution {
public ListNode swapPairs(ListNode head) {
if (head == null || head.next == null) return head;
ListNode dummy = new ListNode(0);
dummy.next = head;
ListNode prev = dummy;
while (prev.next != null && prev.next.next != null) {
ListNode cur = prev.next;
ListNode next = first.next;
cur.next = next.next;
next.next = cur;
prev.next = second;
prev = cur;
}
return dummy.next;
}
}
|
此思路在递归中亦有记载。
1
2
3
4
5
6
7
8
9
10
11
12
13
14
| class Solution {
public ListNode swapPairs(ListNode head) {
if(head == null || head.next == null) return head;
ListNode next = head.next;
ListNode newNode = swapPairs(next.next);
next.next = head;
head.next = newNode;
return next;
}
}
|
删除倒数第N个节点
[19. 删除链表的倒数第 N 个结点]
给你一个链表,删除链表的倒数第 n 个结点,并且返回链表的头结点。
示例 1:
1
2
| 输入:head = [1,2,3,4,5], n = 2
输出:[1,2,3,5]
|
示例 2:
1
2
| 输入:head = [1], n = 1
输出:[]
|
示例 3:
1
2
| 输入:head = [1,2], n = 1
输出:[1]
|
思路
经典快慢指针。
我们要删除 index 为 n 的这个结点,就需要找到 index 为 n-1 的结点,使它的next指向next的next,跳过目标结点实现删除。
所以,我们设置两个指针,快指针比慢指针领先n跳的位置。这样当快指针的next指向null时,慢指针的next也就指向了目标结点。
使用虚拟头结点,使逻辑简化,同时处理一些特殊情况。
1
2
3
4
5
6
7
8
9
10
11
12
13
14
15
16
17
| class Solution {
public ListNode removeNthFromEnd(ListNode head, int n) {
ListNode dummy = new ListNode(0);
dummy.next = head;
ListNode fast = dummy;
ListNode slow = dummy;
for(int i = 1; i <= n; i++){
fast = fast.next;
}
while(fast.next != null){
slow = slow.next;
fast = fast.next;
}
slow.next = slow.next.next;
return dummy.next;
}
}
|
寻找链表交点
160.链表相交
给你两个单链表的头节点 headA 和 headB ,请你找出并返回两个单链表相交的起始节点。如果两个链表没有交点,返回 null 。
图示两个链表在节点 c1 开始相交:
题目数据 保证 整个链式结构中不存在环。
注意,函数返回结果后,链表必须 保持其原始结构 。
示例 1:
1
2
3
4
5
| 输入:intersectVal = 8, listA = [4,1,8,4,5], listB = [5,0,1,8,4,5], skipA = 2, skipB = 3
输出:Intersected at '8'
解释:相交节点的值为 8 (注意,如果两个链表相交则不能为 0)。
从各自的表头开始算起,链表 A 为 [4,1,8,4,5],链表 B 为 [5,0,1,8,4,5]。
在 A 中,相交节点前有 2 个节点;在 B 中,相交节点前有 3 个节点。
|
示例 2:
1
2
3
4
5
| 输入:intersectVal = 2, listA = [0,9,1,2,4], listB = [3,2,4], skipA = 3, skipB = 1
输出:Intersected at '2'
解释:相交节点的值为 2 (注意,如果两个链表相交则不能为 0)。
从各自的表头开始算起,链表 A 为 [0,9,1,2,4],链表 B 为 [3,2,4]。
在 A 中,相交节点前有 3 个节点;在 B 中,相交节点前有 1 个节点。
|
示例 3:
1
2
3
4
5
| 输入:intersectVal = 0, listA = [2,6,4], listB = [1,5], skipA = 3, skipB = 2
输出:null
解释:从各自的表头开始算起,链表 A 为 [2,6,4],链表 B 为 [1,5]。
由于这两个链表不相交,所以 intersectVal 必须为 0,而 skipA 和 skipB 可以是任意值。
这两个链表不相交,因此返回 null 。
|
提示:
listA 中节点数目为 mlistB 中节点数目为 n0 <= m, n <= 3 * 1041 <= Node.val <= 1050 <= skipA <= m0 <= skipB <= n- 如果
listA 和 listB 没有交点,intersectVal 为 0
- 如果
listA 和 listB 有交点,intersectVal == listA[skipA + 1] == listB[skipB + 1]
思路
简单来说,就是求两个链表交点节点的指针。 交点不是数值相等,而是指针相等。
尾部对齐
首先,既然存在交点,那么对于这两个链表而言,交点之后的所有结点就是一模一样的。同时,这个点一定存在于较短的链表的长度范围内。例如A长度为10,B长度为5,绝对会出现在A的后5位,而不是前5位。
那么我们需要做的,就是先求出两个链表的长度,并求出长度的差值,对齐这两个链表,再使用两个指针curA curB逐次操作,让长链表能从短链表起始的位置处开始和短链表结点比较。
如果遇到curA == curB,则找到交点。否则循环退出返回空指针。
1
2
3
4
5
6
7
8
9
10
11
12
13
14
15
16
17
18
19
20
21
22
23
24
25
26
27
28
29
30
31
32
33
34
35
36
37
38
39
40
41
42
43
44
| public class Solution {
public ListNode getIntersectionNode(ListNode headA, ListNode headB) {
ListNode curA = headA; ListNode curB = headB;
int lenA = 0, lenB = 0;
while (curA != null) {
lenA++;
curA = curA.next;
}
while (curB != null) {
lenB++;
curB = curB.next;
}
curA = headA; curB = headB;
if (lenB > lenA) {
int tmpLen = lenA;
lenA = lenB;
lenB = tmpLen;
ListNode tmpNode = curA;
curA = curB;
curB = tmpNode;
}
int gap = lenA - lenB;
while (gap != 0) {
curA = curA.next;
gap--;
}
while(curA != null){
if(curA == curB){
return curA;
}
curA = curA.next;
curB = curB.next;
}
return null;
}
}
|
栈
将A,B两个链表里的内容分别入栈,再依次出栈并比较,当两者不一样时,则已经找到了相交节点。
1
2
3
4
5
6
7
8
9
10
11
12
13
14
15
16
17
18
19
20
21
22
23
24
25
26
27
28
29
30
31
32
33
34
35
36
37
38
39
| import java.util.Stack;
public class Solution {
public ListNode getIntersectionNode(ListNode headA, ListNode headB) {
Stack<ListNode> stackA = new Stack<>();
Stack<ListNode> stackB = new Stack<>();
ListNode currentA = headA;
while (currentA != null) {
stackA.push(currentA);
currentA = currentA.next;
}
ListNode currentB = headB;
while (currentB != null) {
stackB.push(currentB);
currentB = currentB.next;
}
ListNode intersection = null;
while (!stackA.isEmpty() && !stackB.isEmpty()) {
ListNode nodeA = stackA.pop();
ListNode nodeB = stackB.pop();
if (nodeA == nodeB) {
intersection = nodeA;
} else {
break;
}
}
return intersection;
}
}
|
环形链表
142.环形链表II
给定一个链表的头节点 head ,返回链表开始入环的第一个节点。 如果链表无环,则返回 null。
如果链表中有某个节点,可以通过连续跟踪 next 指针再次到达,则链表中存在环。 为了表示给定链表中的环,评测系统内部使用整数 pos 来表示链表尾连接到链表中的位置(索引从 0 开始)。如果 pos 是 -1,则在该链表中没有环。注意:pos 不作为参数进行传递,仅仅是为了标识链表的实际情况。
不允许修改 链表。
示例 1:
1
2
3
| 输入:head = [3,2,0,-4], pos = 1
输出:返回索引为 1 的链表节点
解释:链表中有一个环,其尾部连接到第二个节点。
|
示例 2:
1
2
3
| 输入:head = [1,2], pos = 0
输出:返回索引为 0 的链表节点
解释:链表中有一个环,其尾部连接到第一个节点。
|
示例 3:
1
2
3
| 输入:head = [1], pos = -1
输出:返回 null
解释:链表中没有环。
|
思路
首先是判断是否有环。
如果链表里存在环,分别定义 fast 和 slow 指针,循环着移向下一位的指针永远也不会到达null。如果这两个指针一个快一个慢,它们迟早会撞上,而且一定是在环内相遇。
其次是如何寻找这个入口。
假设从头结点到环形入口节点 的节点数为x。 环形入口节点到 fast指针与slow指针相遇节点 节点数为y。 从相遇节点 再到环形入口节点节点数为 z。
那么相遇时: slow指针走过的节点数为: x + y, fast指针走过的节点数:x + y + n (y + z),n为fast指针在环内走了n圈才遇到slow指针, (y+z)为 一圈内节点的个数A。
因为fast指针是一步走两个节点,slow指针一步走一个节点, 所以 fast指针走过的节点数 = slow指针走过的节点数 * 2:(x + y) * 2 = x + y + n (y + z)
两边消掉一个(x+y): x + y = n (y + z)
因为要找环形的入口,我们希望得到x的值,因为x表示 头结点到 环形入口节点的的距离。
x = n (y + z) - y ,
整理公式之后为如下公式:x = (n - 1) (y + z) + z
(n - 1) (y + z)是一个完整的环,不对相遇产生影响,所以这个公式可以理解成:x = z。
这就意味着,从头结点出发一个指针,从相遇节点 也出发一个指针,这两个指针每次只走一个节点, 那么当这两个指针相遇的时候就是 环形入口的节点。
就可以在相遇节点处,定义一个指针index1,在头结点处定一个指针index2。让index1和index2同时移动,每次移动一个节点, 那么他们相遇的地方就是 环形入口的节点。
1
2
3
4
5
6
7
8
9
10
11
12
13
14
15
16
17
18
19
20
21
| public class Solution {
public ListNode detectCycle(ListNode head) {
ListNode slow = head;
ListNode fast = head;
while (fast != null && fast.next != null) {
slow = slow.next;
fast = fast.next.next;
if (slow == fast) {
ListNode index1 = fast;
ListNode index2 = head;
while (index1 != index2) {
index1 = index1.next;
index2 = index2.next;
}
return index1;
}
}
return null;
}
}
|